Some product links are affiliate links which means if you buy something we’ll receive a small commission at no cost to you.
Fa-la-la-la-la-la-la-la-laaaaa
It’s Christmas time!
Aka the MOST wonderful time of the year!
I don’t know about you but this time of year when I am stuck inside, I am constantly looking for things to do!
I am also trying to keep a bored toddler entertained.
Cue Christmas craft time!
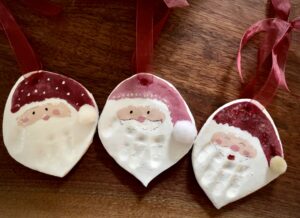
These handprint Santa ornaments are seriously the cutest and they are also seriously easy to make!
Here is what you will need to add to your amazon list:
Acrylic Paints (I used white, brown, burgundy and rose but you can use whatever colors you’d like!)
Mod Podge Waterbase Sealer, Glue and Finish (I use the gloss version)
Ultra Fine tip black sharpie marker
A straw
Pom poms (color and size of choice)
Glitter (optional)
And woohoo! You are on your way to making the cutest handprint Santa’s!
*Note* these do take about a week to complete so make sure you give yourself plenty of time before gifting or enjoying yourself!
So lets get started on how to actually make these things.
Step 1 – Roll Out the Clay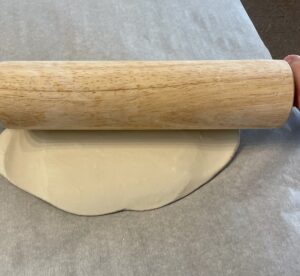
Take a glob of Crayola Air Dry Clay out of the bucket and roll it out flat with a rolling pin (I would suggest doing this on parchment paper to avoid mess). Now, the thickness is kind of up to you but I don’t like mine to be too thick or too thin. Too thin would put them at risk of breaking and too thick would make them look bulky. Try to do somewhere in between!
Step 2 – Imprint the Hand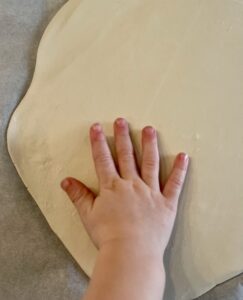
Bring those eager little toddler patties over to the counter and push em into the clay. You will want the fingers to be closer together with the thumb a little out to the side (this will be the end of the hat). You’ll have to push each of their fingers in individually to leave a good imprint in the clay so make sure you don’t skip this step! PS my toddler LOVES this!
Depending on how many you want to make, make sure you space the handprints out on the clay so you have room to cut them appropriately!
Step 3 – Cut O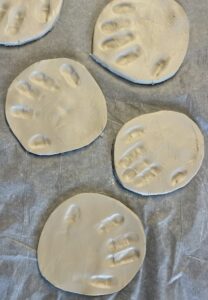 ut the Santa’s
For this step you will want a flat edge knife that doesn’t have any grooves in it (i.e. don’t use a butter knife). As smoothly as you can, cut out a bit above and below the handprint. For some of my Santa’s, I cut below the fingertips into a small point (which will be his beard), and some I just kept round – whichever you do is completely up to you.
After you cut them out you will want to smooth out the edges and any small imperfections you may see. You can wet your fingers with a TAD bit of water to help you out with this. When I say a tad, I really mean a tad!
Keep in mind – the shape doesn’t have to be perfect!
Step 4 – Make the Opening for the Ribbon
For this next step, you’ll want to take a straw (I use a hard reusable straw) and gently press it at the back of the hand (right near the palm) to make a little opening. This is where your ribbon will go. For this part you don’t want to be too close to the edge of the clay so make sure you give a little leeway.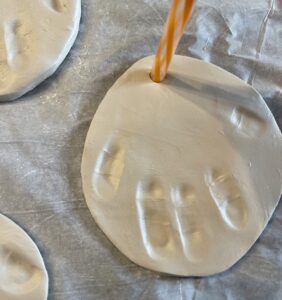
After you create the opening, if you are making more than one Santa, I would recommend digging the clay out of the straw each time if this is a straw you plan on reusing. I take a fork prong and scoop it out. Otherwise, it just keeps building up and is harder to clean at the end! Once you are done using your straw, get as much of the clay out with the fork as you can and then run hot water through it until the rest comes out – works like a charm!
Step 5 – Lay Out to Dry
I transport all of my Santa’s on the parchment paper to a safe place where I will let them dry for a few days. Once you lay them down to their resting spot, lightly press around each one to make sure all of the edges are flat so you don’t have any wavy Santa’s when they are dry! For this step, the longer that you let them dry, the better. Try to let them dry a few days at minimum.
Step 6 – Paint Those Santa’s!
Now that your Santa’s are fully dry, it’s time to paint them to life! The first thing you’ll want to do is paint the whole thing white since most of the ornament is going to be Santa’s fluffy beard! Make sure you paint the edges too. It’s up to you whether you want to paint the back or not. Let dry.
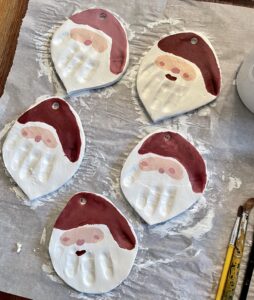
I’m going to break these next parts up into sub steps to make it easier to follow. After each of these steps you will want to let dry in between.
Paint the face outline
Paint the Santa face outline with whatever skin color you like. I painted the outline right above where the fingers began (since they are the beard). This part doesn’t have to be perfect and you don’t need to make his face outline big either (again because a lot of it is covered with the beard/hair).
Paint the rosy cheeks, nose and mouth
I took some rose colored paint and painted little round rosy cheeks and noses onto each of my Santa’s. On a couple of them I also painted a small rounded mouth with some darker paint as well.
Paint the mustache
Take your white paint again and paint a swirly mustache under the nose! Go as big, or as small as you’d like! To separate the mustache from the beard, I added some little globs of paint to the mustache to give it some texture and to help it stand out a little bit more. This part is totally optional though.
Paint the hat
Next you’ll want to paint the famous Santa hat. For this you’ll want to stay a little bit above the face and paint all the way into the thumb. On some I painted up to the top of the clay and on some I left a little bit of a white border. I made each of my Santa hats a little bit of a different color – have fun with it! And again, this part doesn’t have to be perfect.
Paint touch ups and fun details
When I was done painting all of the main parts, I didn’t like how some things turned out so I went back over some things to touch them up and “perfect” them.
I also added fun details to some of the hats like little polka dots!
Step 7 – Sharpie Time
For this portion you will want a fine point sharpie. I did slightly different things with each Santa for this part. For some, I outlined the mustache, some, the hair. For some Santa’s I drew his eyes closed, and for some, open. The sky is the limit! Get creative with this one!
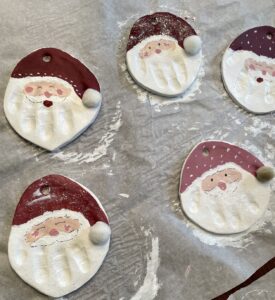
Step 8 – Mod Podge and Glitter
If you do not want to add any glitter, skip this part and go to Step 9. I don’t know about you but I love all things sparkly and shiny, so naturally, I love glitter! For my Santa’s, I chose to use a clear glitter, and again, I made each one a bit different! I put some all over the hat, some just on the beard, some the mustache and some on the brim of the hat.
Before you put the glitter on, you will want to use a paint brush to paint some Mod Podge on the area you want the glitter to stick to. Once you do this, glitter away and let dry.
Step 9 – Mod Podge the Whole Thing
In order to make your masterpiece last longer and to seal all the work you just did, you’ll want to add a layer of Mod Podge to the whole Santa. Make sure you get the whole front, back, and edges (of course letting dry in between).
Step 10 – Pom Pom Time
Pick a color to compliment your theme (I chose some white and some tan) and glue it to the end of the thumb. I used super glue but you could also use a hot glue gun. For some Santa’s I used larger pom poms and some, smaller. It all depended on the size of the Santa as to which one I’d use.
Step 11 – Signing the Back
Don’t forget to take a sharpie and write your kiddos name, age, and the month/year on the back! This will be something everyone cherishes for years to come and they will want to know how old that little hand was that made such an amazing Santa.
Step 12 – The Ribbon
Ah, the final touch to your adorable Santa hand ornament. You could choose any number of different ribbons for these. Going with my theme of more rose colored/burgundy Santa’s, I chose a burgundy colored organza ribbon that looks so sheen and sleek! I love that it doesn’t take away from the Santa itself at all, it just adds another special element. Once you find your perfect ribbon, tie it into a cute little bow and voila!
Now you are ready to gift these jolly little guys and hang them on your tree for everyone to admire!
The thing I love so much about these are they don’t have to be perfect.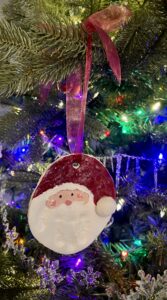
Actually, them being imperfect, I think, makes them better!
They are so original and cozy looking, I just love them!
I personally can’t wait to gift these to my family members, I know they will cherish them as much as I do.
And I seriously had a blast making them.
It gave me something interesting, creative, and fun to do when there’s not a lot else you can do this chilly time of year.
I am looking forward to seeing all of your Santa hand ornament creations, please send them in!
Until next time,
XOXO,
Katie
