Some product links are affiliate links which means if you buy something we’ll receive a small commission at no cost to you.
Ah, my favorite time of year – the weather is getting more crisp and cool, the leaves are changing, and the scent of cinnamon is in the air. Pumpkins are around every corner and you are certain to find apple cider in every shop. I love the coziness of fall, and with fall comes one of my favorite holidays – Halloween! I’ve loved Halloween for as long as I can remember, always loving to dress up and being fascinated with spooky things like witches, ghosts, and ghouls.
Now that I’m the mom of a young toddler, Halloween looks a little bit different these days. Instead of spooky Halloween, we focus on the not-so-spooky parts. These not-so-spooky parts include family Halloween costumes, toddler Halloween activities, and adorable first Halloween costumes. They also include super cute crafts like the one I’m going to share with you today!
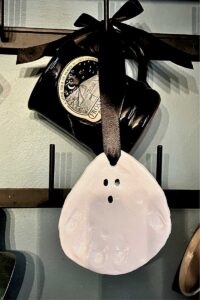
Keeping my love of spooky things in mind, I’ve created an adorable not-so-spooky handprint ghost craft! This is adorable and is perfect to hang or set on a side table and encompasses all things Halloween. Here’s how to make this cute little ghoul with your cute little goblin!
Supplies
Here is what you will need to add to your Amazon list:
Mod Podge Water Based Sealer, Glue, and Finish (I use the gloss version)
Ultra Fine Tip Black Sharpie Marker
A Straw (optional)
That’s it! Easy-peasy. Now, read below to find out what steps you need to take to put it all together.
*Note* these do take about a week to complete so make sure you give yourself plenty of time before gifting or enjoying yourself!
Step 1 – Roll Out the Clay
Take some of the Crayola Air Dry Clay out of the bucket and using a rolling pin, roll it out flat. Tip: Roll it out on some parchment paper to make it less messy. Try not to roll it too thick or too thin! If they are too thin, they could break and if they are too thick they might look bulky. Try to eye it up and do something in between!
Step 2 – Imprint your Kiddos Hand
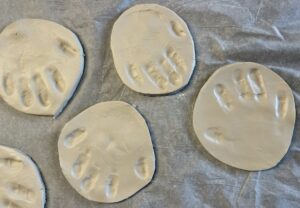
This is my toddler’s favorite part, she loves it! If you have a learning tower for your counter you can use that, if not, you could hold them up to the counter or table. Press your child’s hand into the clay, making sure you push their palm and each finger into the clay individually so it leaves a nice imprint. Their fingers can be stretched out wide or be close together, however the two of you want!
Depending on how many you want to make, make sure you space out the handprints on the clay so you have room to cut them appropriately!
Step 3 – Cut The Handprints Out
For this step, you will want to use a knife with a flat edge that doesn’t have any grooves in it. Cut out a little bit above and below the handprint as smoothly as you can. The palm area will be the top of your ghost, and the fingers will be the bottom. If you want to put a ribbon on it so you can hang it somewhere, keep this in mind when you’re cutting so that you give yourself enough room for that.
When you’re done cutting them out you’ll want to smooth the edges and fix any small imperfections you may see. Wet your fingers with a TINY bit of water to help you out with this. When I say a tiny bit, I really mean a tiny bit!
Keep in mind – the shape doesn’t have to be perfect!
Step 4 (Optional) – Make an Opening for the Ribbon
To make a hole for the ribbon, you’ll want to use a straw (a hard reusable straw is best) and press it in the back of the hand (right near the palm) to make a small opening. This is where your ribbon will go. You don’t want to be too close to the edge of the clay or else it may cause it to break so make sure you give it a little wiggle room.
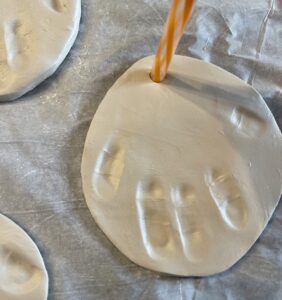
If you are making more than one handprint ghost, I recommend getting the clay out of the straw each time if you plan on reusing the straw. The easiest way I have found to do this is using a fork prong to scoop it out. If you don’t, it will just keep building up and will be harder to clean out at the end! Once you are done using the straw on all your ghosts, get as much of the clay out with the fork as you can and then run very hot water through it until the rest comes out – works like a charm!
Step 5 – Lay Them Out to Dry
I put all of my ghosts on parchment paper and transport them to a safe place where I let them dry for a few days. Once you lay them down on their safe spot, LIGHTLY press each one to make sure all of the edges are flat. You don’t want to have any wavy ghosts when they are dry! The longer that you let them dry, the better. Try to let them dry for a few days minimum.
Step 6 – Painting and Creating the Face
Paint each of your kiddo’s handprints with washable white paint and let them dry. I painted the back and the front of mine but if you choose to paint just the front, make sure you get the sides, too! Once they have dried, using an ultra-fine point sharpie, draw on the cutest eyes and mouth. This step is super simple and easy and you can make any kind of face you want! Have fun with it.
Step 9 – Mod Podge
If you want to make your child’s masterpiece last longer and seal all the work the two of you just did, add a layer of Mod Podge with a paintbrush to the whole thing. Make sure you get the whole front, back, and edges (of course letting dry in between).
Once it’s dry if you want to hang it, add a ribbon (color of your choice), and voila! All done! This can also make an adorable little dish to sit around on a coffee table or side table as well.
I hope you had fun creating this simple and easy craft with your little one! Looking at mine puts an immediate smile on my face and I can’t wait to get it out each year and reminisce. These little crafts are such a perfect way to preserve time as our little ones will never be this little again!
I hope you have a wonderful, not-so-spooky Halloween!
XOXO,
Katie
